My coding setup now includes local LLMs but no more permission prompts
·My journey to optimise my agentic coding setup has now led me to consider running an LLM locally and removing all permission prompts. Even though I don’t check every action of the agent anymore, I feel much more in control of what they are doing. My setup is now comprised of pi as my main coding agent, a sophisticated sandbox setup, some helpful tools and a wide mix of LLMs.
Overall, I have optimised my setup towards a solution that I fully comprehend. This means I have learnt a lot along the way, but I also had to go through some extra rounds because I did not rely on pre-packaged tools. This has cost some extra time, but has already paid off with my better understanding of what happens when something behaves differently than I would have expected. It is definitely not a setup for everyone, but as a (neo)vim user, I feel much more at home now.
No more permission prompts
For some time now, I have wanted to get rid of permission prompts. They don’t let your agent work on its own for a long time and force you into an intense context-switching mode. As managers, we spend a lot of time creating environments where people can independently apply their skills. If you need to micromanage, there is normally something wrong on the macro level. Furthermore, permission prompts not only grab your attention, but they also feel a bit addictive and give you a false impression of control. This is summarised quite well by the following HN comment:
Interacting with LLM coding tools is much like playing a slot machine, it grabs and chokeholds your gambling instincts. You’re rolling dice for the perfect result without much thought.
The frontier labs provide ways in their coding agents to sandbox things on your machine. But these sandboxes will be directly on your (host) machine. In that case, your agent will still be limited by the sandbox, as it will not be able to perform all the tasks it wants on the host. You can spend some more time on adding more fine-grained “allows” to your config. But in the end, I want my agent to avoid roadblocks. Thus, I moved to running them entirely in a sandbox Docker container. Here, it can install what it wants and change the whole system to suit its work. Still, you need to provide it with a convenient working environment. Thus, my sandbox container:
- Has a wide set of useful tools pre-installed. Partly via
apt-get, partly viapixi global - It comes with my default shell config, so I also feel very much at home.
- The current working directory is mounted into the container with write permissions
- Some configuration from my home directory (git, coding agent) is also mounted, maybe also partially rewritten to remove some credentials or change endpoints
- The sandbox has a GitHub token, but only for reading public repositories. It might get more scope or different tokens for different projects, but for now, I didn’t feel the need for secretive or other, more permissive access.
- There is a
Justfileto update the lockfiles for the base packages and rebuild the container
Not only is the sandbox container itself important, but so is the command that starts it. It does parts of the configuration rewrites, but it also does selective credential passing and replaces them with dummy values. Furthermore, as my main laptop is an Apple one, the container is not running the same operating system as the host. Thus, I also need to ensure that the development environment uses the native binaries there. Thus, I create a new volume for each working directory to store the .pixi directory. This is always done because all my projects have a pixi.toml:
# Create a named volume for .pixi cache, derived from the current working directory
VOLUME_NAME="pixi-cache-$(echo $PWD | sed 's/[^a-zA-Z0-9]/-/g')"

# Create the volume if it doesn't exist
docker volume inspect "$VOLUME_NAME" &>/dev/null || docker volume create "$VOLUME_NAME"
Some projects also use (p)npm as their package manager, thus I search on startup for node_modules folders, and give them their own, path-defined volume:
# Find all node_modules directories and make a volume for them
while IFS= read -r dir; do
    dir="${dir%/}"
    volume="npm-cache-$(echo "$dir" | sed 's/[^a-zA-Z0-9]/-/g')"
    abs="$(cd "$(dirname "$dir")" && pwd)/$(basename "$dir")"

    docker volume inspect "$volume" &>/dev/null ||
        docker volume create "$volume"

    mount_args+=("-v" "${volume}:${abs}")
done < <(
    fd --type d 'node_modules' -E '.pixi' --prune -I |
        grep -v 'node_modules/.*node_modules'
)
With this, I have a sandboxed coding environment where my agent and I both feel productive. An important implementation detail is that the sandbox needs to start up very quickly. I want it to be the default environment, not a fallback. Initially, there was a code snippet that looked up the Git identity using the provided GitHub token. I have removed that because it costs a few seconds of startup time, even with a really good internet connection.
Restricting internet access in my sandbox
While the agent can go wild inside the sandbox, some internet access is still required for it to do its work. I don’t want to give it full internet access, as this can make it prone to leaking confidential stuff. The main risk is supply chain attacks, in which packages contain code that extracts credentials. Nevertheless, we also don’t want any other business secrets leaking. With constrained internet access, I feel much more confident trying out all kinds of libraries, tooling, etc. My internet proxy is based on the work in mattolson/agent-sandbox. I used a coding agent to extract the proxy component into a standalone repository, since I didn’t want to use the other parts. I have my personal taste, and I wanted to incorporate it. The proxy is set up using mitmproxy and intentionally “breaks” TLS encryption. While this has the disadvantage that I will have to include a custom set of certificates in my actual sandbox container, it has the following benefits:
- There is no reliance on the fact that the hostname given to the
HTTP CONNECTstatement is really the one you want to reach. - We can use path-based and verb-based allowlists, making it much more granular.
- We can inject credentials into HTTP requests, so that I don’t need to give my agent sandbox credentials that could otherwise leak to the wrong service.
To ensure that the sandboxes can access the internet only via the proxy, we must also place them on an isolated network segment. The proxy itself needs an internet connection, so we connect it to two networks. As plain
docker runcommands only take a single network, this needed a small dance:docker run -d --name http-proxy --network isolated … docker network connect external http-proxy docker attach http-proxySimilarly, we now need to start the sandbox container with
--network isolatedto ensure that it doesn’t have plain internet access.
Although restricting internet access leads to the ultimate and secure sandbox, it is the one feature where I significantly realise the downsides of sandboxing. Web search is a critical tool for solving many problems. While you can whitelist the search API itself, you will run into problems fetching results. You can whitelist quite a few documentation URLs, but there will be random results that come back. Additionally, do you really want to allow all of Reddit? This is something I will need to look into quite soon, as it severely limits my work and either needs me to preload a lot of context from a previous planning session or whitelist (and thus rerun) a lot of URLs.
For my conda-forge work, I will thus run my sandbox without internet restrictions in the near future. There is nothing left in my sandbox to leak since I can also strip the LLM API credentials, and I do review everything before I push. Everything that happens in the sandbox is already visible to the whole world or will be once I push it to GitHub.
pi as my new coding agent (default)
The “no more permission” prompts were mostly a wish I had long wanted to fulfil. The implementation was finally triggered by my move to pi as my main coding agent. I still use Claude Code and Codex from time to time, but they are no longer my main driver. Claude Code frustrated me because I felt it treated every problem as complex. This worked quite nicely for the complex ones, but for the rather simple ones, it was doing too much, in my view. Because it is closed-source, you cannot fully inspect it. While Codex suffers less from this (open-source, less “wild” on simple problems), it still treats things as a bit too complex, and it also assumes in some places that you are using a GPT model. This is a fair assumption as it was built for them, but I wanted to expand my model matrix.
My main reason to go with pi is that it is a minimal harness. It does fewer things, and thus it is easier to understand what it does. While this may be limiting for some problems, I’ve found it works much better for most of the problems I’m tackling. Furthermore, pi is independent of the model provider; thus, I can easily switch between many different models, and it doesn’t rely on assumptions about a specific model’s behaviour.
While I tried to use barebones pi for some weeks, one thing that was clearly lacking was web search. For problems where the model had limited knowledge, web search is essential, and thus, I have installed pi-web-access as the sole extension for now.
The last weeks of pi usage made me very happy as I understand what my agents do and they solve nearly all the problems I give to them. In future, I can see myself adding more extensions, e.g. for writing loops with /goal or for starting subagents.
Local inference as part of the LLM mix
Partly due to our large token bill, partly because of missing internet connectivity, and also out of curiosity, I wanted to switch my workflow to use a local LLM for coding as well. While I’m fully aware that even the biggest MacBook Pro won’t be able to compete with cloud-hosted LLMs in terms of size and speed, field reports from all corners of the internet indicate that you can still accomplish a wide range of tasks with it. Personally, I’m more than happy with the outcome here. I can use local LLMs to do a lot of my work. Especially in situations where I have connectivity problems, this helps me be even more productive.
Still, I don’t think this will be the default way anytime soon. It will probably need some more time (months, years?) to develop. We will see how we will look back at this time. There are still many significant drawbacks to using local LLMs compared with those hosted in the cloud.
- Setting up local LLM serving isn’t trivial. At first, I used
llama.cppto run some models, but there were many parameters to configure, and I’m still not 100% sure I found the correct and most powerful combination. Instead, I’m now mainly using ds4 as my main (coding) LLM runner. This is a tailored runtime for the DeepSeek-V4 models and can serve DeepSeek-V4-Flash in 2-bit quantisation with 96GB RAM. The code is optimised to run on Apple Silicon, which is one of the main targets. - Coil whining and fan noise are typically not something you associate with a MacBook, but if you use a local LLM, this is something you have to get used to. These two lead to another annoying issue: your laptop (and charger) gets really hot. So hot that you don’t want to touch certain parts of it. This makes using LLMs uncomfortable for you and your environment. The common workaround here is to set your MacBook to a low-power setting, which will produce less heat but also make the LLM much slower.
- As local RAM is limited, you will also be limited in the size or power of an LLM you can run locally. You may be able to use SSD streaming to load larger LLMs, but it comes at an even higher speed penalty.
- With the current local serving mechanisms, you’re mostly limited to a single request at a time. You may be able to do some batching during the decode phase locally, but at the moment, a single request typically saturates your GPU. Your tokens per second might increase in the future if better speculative decoding models come out, but this will simply make a single request faster, not allow you to serve multiple requests at once.
These all sound like major drawbacks, but I still like having my local LLM available, and it’s useful in many cases. Especially in the future, I expect that some of those will actually vanish, and we will have techniques to make the local usage much more available.
Automatic local code reviews
While I was working on the blog post, we also upped our game in agentic code reviews in GitHub. The better reviews are really helpful for development and also motivate you as a developer to make your code even better. For that, I’ve been looking into ways to review my code locally. One tool I discovered was roborev. This runs as a post-commit hook and reviews the commits locally. It’s mainly built for agents, but I also think it’s really useful to have running for manual commits. I have installed this on repositories where I make large changes to review all my commits. In most cases, it will review before I push. In some cases, especially when CI takes a long time, I will push and then review while CI runs.
I have intentionally set up roborev to use the LLM that is running on my local laptop. While this means the commit review can run independently of my connectivity status, it also means that every commit I enable in this project will heat up my machine and consume a lot of power. Sometimes I don’t want to review commits directly, but do it later when it is okay to use up my GPU and my power for this. Thus, I have asked the upstream maintainers for a pause command, which they happily implemented as roborev pause and roborev unpause.
mactop for monitoring the system load
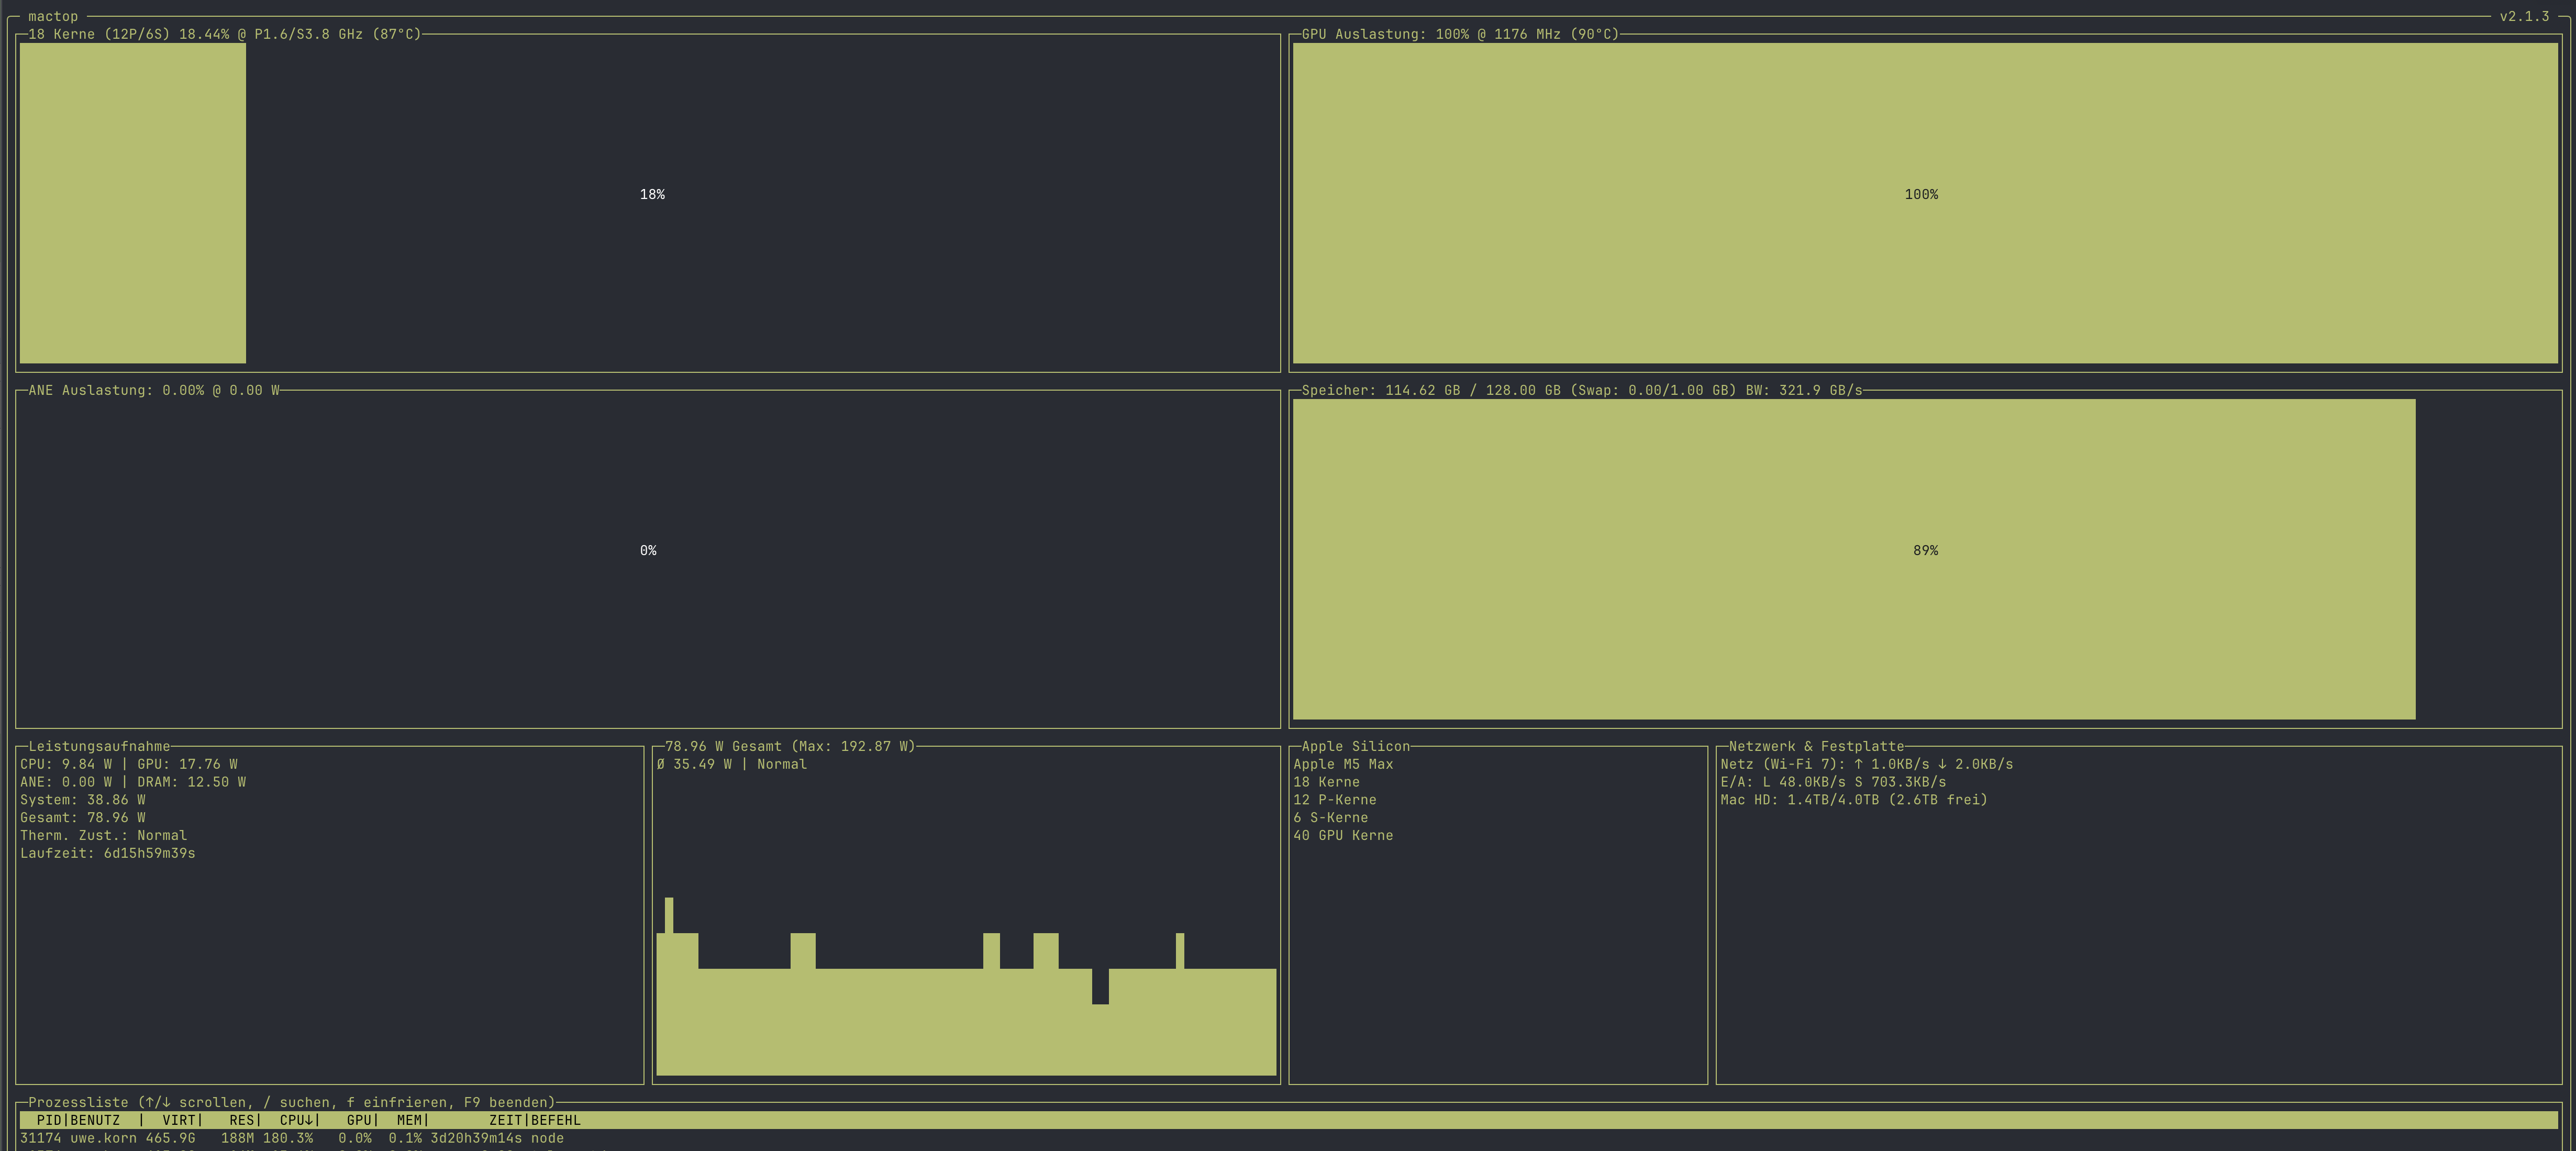
One issue that arises with a heavy load on your laptop is knowing when you actually put too much load on it. For this, I now always have a tab in my shell open where I watch mactop (you can run conveniently via pixi exec mactop). This runs without sudo and gives a comprehensive overview of the load and power usage. While I can see it in my battery levels, it is still exciting to see the raw numbers showing why your battery drains even when you’re connected to a power socket. This is a good indicator for me that my 100W travel charger might need an upgrade soon.